
Originally published at: One To One NAT On Palo Alto Firewall For Access To Internal Untrusted Network | Indeni

Many implementations use NAT to provide public internet access (untrust) from an internal private network (trust) considering address preservation and security on the private network space. One of the less popular use case but is effective in every way is on providing connectivity to internal networks that have a less robust security posture such as development and laboratory networks.
In both cases, NAT still boils down to the traversal of packets from a trusted domain to an untrusted network. This guide will show the step by step procedure on how you can accomplish one to one static NAT on a Palo Alto firewall for an internal untrusted network.
Let the diagram below be our working diagram. Note that the user subnet is 10.1.1.0/24 (zone: trust), the routable private IP space is 10.2.2.0/24 (zone: untrustA) and the laboratory/test subnet is 10.3.3.0/24 (zone: untrustB).
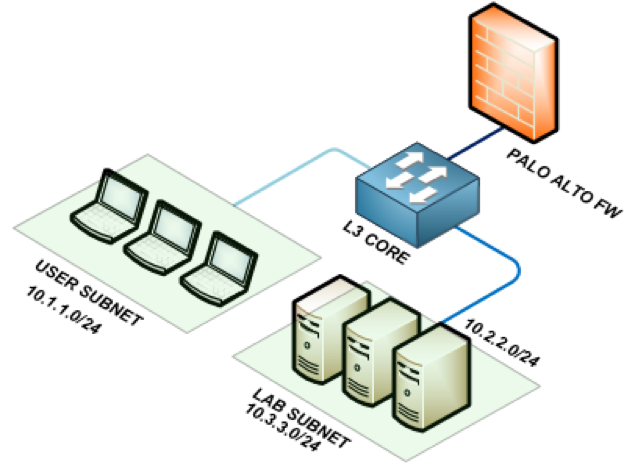
Scenario: The server 10.3.3.5 needs to be reachable on the user side over port 80. The Palo Alto firewall serves as the main layer 3 gateway so the switch is just passing all traffic to the firewall. The LAB subnet is obscured and is not propagated within the network.
STEP 1: Understand how NAT is being handled by the firewall
One to one NAT is termed in Palo Alto as static NAT. For all NAT processes, the firewall reads the pre-NAT parameters such as pre-NAT IP address and pre-NAT zone. On the corresponding security rule however, the pre-NAT IP is preserved while post NAT zone parameter is changed to the corresponding destination zone after NAT. Below is a diagram to visualize this.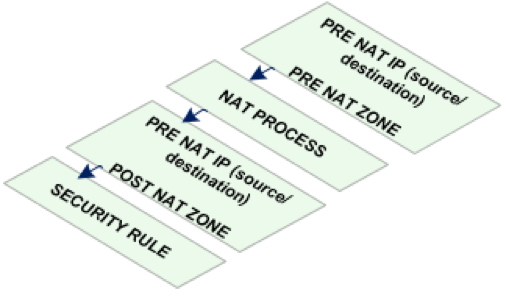
STEP 2: Create the zones and interfaces
- Login to the Palo Alto firewall and navigate to the network tab. Here you will find the workspaces to create zones and interfaces. 
- Create the three zones, trust, untrustA, untrustB, in the zone creation workspace as pictured below.
- Create the layer 3 interfaces and tie them to the corresponding zones along with the IP addresses. The firewall can use the first usable address for simplicity.
STEP 3: Configure layer 3 routing
- Navigate to the virtual router workspace and configure any layer 3 requirement of your network. In this case, we will just have a default route going out to the internet although this is not a requirement for the set-up.
STEP 4: Create the NAT statements
- You can now proceed to defining the NAT statements on the firewall. Navigate to the policies tab and select the NAT workspace. 
- Our purpose is to allow traversal of traffic from the internal user subnet going into the lab devices on untrustB using the routable private IP space. In this case, the pre NAT parameters will be as follows.
STEP 5: Create the matching security rule
- Every NAT rule should be paired with a corresponding security rule. Navigate to the security workspace on the policies tab. 
- As established earlier, the pre-NAT IP is preserved at least on how the firewall processes the packet so the security rule will still utilize the pre-NAT IP addresses but the post NAT zone will be used this time.
We hope this was informative to you! Head over the to Indeni Crowd to continue the discussion on Palo Alto Firewall Solutions.
Thank you to Ralph Masajo for contributing this article.