
Originally published at: Juniper SRX Firewall (100, 210, 240) - Manipulating Traffic w/ Flow Mode | Indeni

Every experienced Network Engineer and System Administrator will agree with the fact that firewalls are an essential part of every network. They provide essential security from the outside world and hacking predators which are patiently waiting to exploit every possible mistake you can make when you are implementing your network.
The standardized definition of firewalls, which use various rules to protect your network and control the traffic both coming in or going out of the firewall, has changed over recent years. Lately, firewalls have been produced to offer a lot more than just policing. They have been given new and more complex capabilities. One of the most important to note is their ability to look deeper into the packets traversing through them and being able to gather all that information and implement it in a way that would be the most beneficial for the network they are protecting. This deep packet inspection is the main feature with Juniper’s SRX Series Gateways and even though Juniper haven’t invented it, they worked on finding the most suitable way to solve problems their customers face. They used various methods to achieve this and worked from the ground up on the complicated new SRX platform which made them influential among the biggest enterprises in the world.
Juniper SRX Series
Juniper SRX Series Gateways are known as the beginning of Juniper’s “attack” on global Service Providers. They are the first devices that have been migrated from the previous Screen OS operating system to the new Junos OS which provides a more in-depth view in configuration, maintenance, and operation. Junos is a state of the art operating system based on FreeBSD which is a UNIX implementation. Therefore, engineers can execute standardized UNIX commands. Besides the many features that Junos OS provides, one of the highly attractive ones is the option to change how the device is inspecting and processing the traffic. Or, in other words, manipulate traffic based on yours or your customer’s needs. It’s important to note that different networking vendors have different solutions that handle passing traffic. With Juniper SRX devices, this is done by changing the default mode of operation of the device. There are two options you can choose from: flow mode and packet mode.The most common definition that can be found regarding these modes, and the difference between them, is: flow mode traffic processing analyses all traffic passing through by the state or session of traffic while packet mode processes all traffic as a traditional router, widely known as per-packet basis. It is worth mentioning that all Juniper SRX devices work in flow mode by default. Let’s dig in a bit more in how these modes operate.
Understanding the flow mode operation
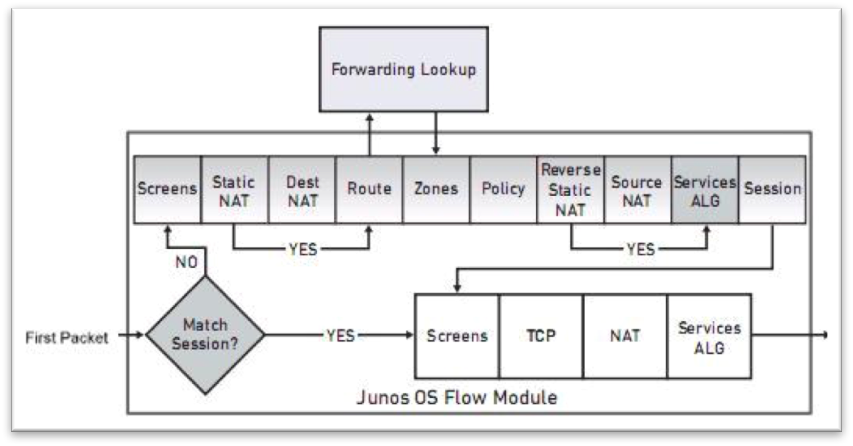
We will start from the default mode of Juniper SRX devices, the flow mode. This mode is also known as the stateful mode. This is the more complex one because it needs to monitor the state of all traffic passing through the firewall. Unlike past firewalls, where you could choose from packet-based, proxy, or stateful, the future of firewalls is the stateful firewall because of the attractive price/performance ratio they offer, therefore they are most commonly deployed. Although packet-based and proxy firewalls are slowly becoming part of the past, the stateful firewall has “stolen” some features from its predecessors. Two important features are:- SSL traffic decryption
- IPS (Intrusion Prevention System) inspection which provides the ability to accurately determine the protocol beyond the traditional port number
Original Source: - Juniper Networks
Understanding the packet mode operation
On the other hand, the packet mode operation is a simple, routing-like, operation of a firewall. This mode provides the firewall to inspect packets individually and not as part of a session flow. With this mode, as soon as the packets enter the firewall, various filters and policies are being added. After these are applied, the firewall will look for the route so that the egress interface for that packet can be determined. When the egress interface is determined, and confirmed, the packet is sent there, where it’s scheduled for transmission. Because the packets are individually inspected, any decision to allow or deny the traffic is packet specific. In packet mode the firewall doesn’t have to determine how the sessions are established and keep track of every session. This provides an optimal routing of the packets which sometimes can be handled by the ASICs. The image below shows how the packet is processed once it enters the firewall:
Original Source: Packet-Based Forwarding | Flow-Based and Packet-Based Processing User Guide for Security Devices | Juniper Networks TechLibrary
With Junos 9.6 and beyond, Juniper decided to provide the option for both modes to operate simultaneously. This eventually avoids the limitation of having to choose between both modes and what they offer, providing simplicity in configuration and deployment. In this case, the traffic that requires packet mode processing is marked by packet filters, while the traffic that requires flow mode processing is left unmarked. This way, the firewall can determine which processing mode to use. This is simple to understand through the image below:
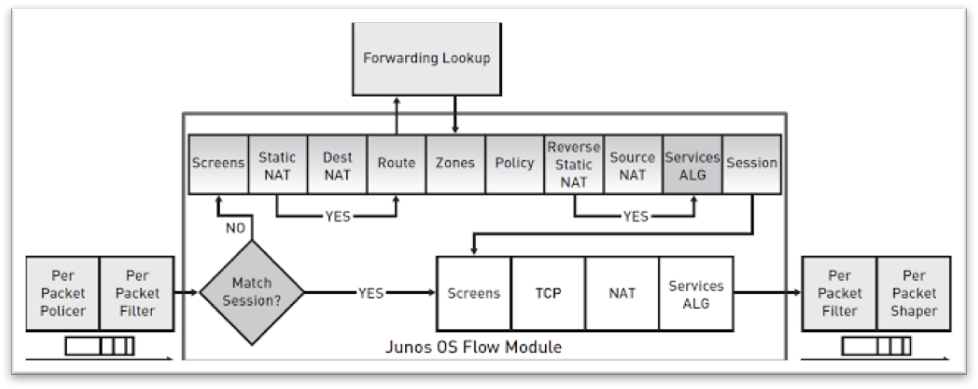
Original Source: http://jncie-sec.exactnetworks.net/2012/10/junos-flow-based-processing.html
A short list of protocols supported by the two modes is provided in the table below:

Sample deployment of a flow mode configuration with NAT and DHCP
For this sample deployment, we are going to use a real-world example of how flow mode is deployed on a Juniper SRX platform. We are going to focus on the SRX device deployed on customer’s site and specifically on customer’s requirements. This sample deployment will show the sample configuration, including the needed steps to take when configuring it.
The client has requested:
- A DHCP server to be configured on the Juniper provided by their Service Provider. They require a separate private IP block assigned by the DHCP, to use for Internet browsing.
 Next, we must confirm what is needed to meet their requirements. For this requirement to work as expected we need to focus on a couple of things:
- The customer used to browse the Internet with a public IP block. This public block would have been routed in the core network of the Service Provider.
- The customer would like to use a private block instead. This means that a protocol called NAT will have to be implemented. This protocol will translate the private IP block in a single public IP address.
- A DHCP configuration will have to be deployed to assign IPs from the private IP block.
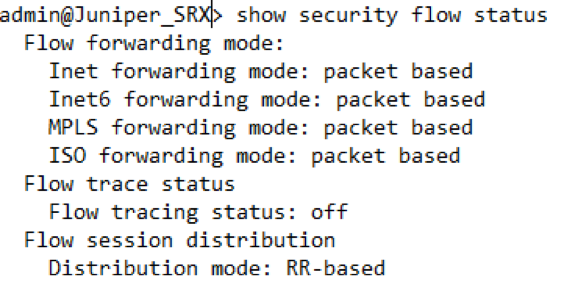
- The Juniper SRX will have to be configured to operate in flow mode.
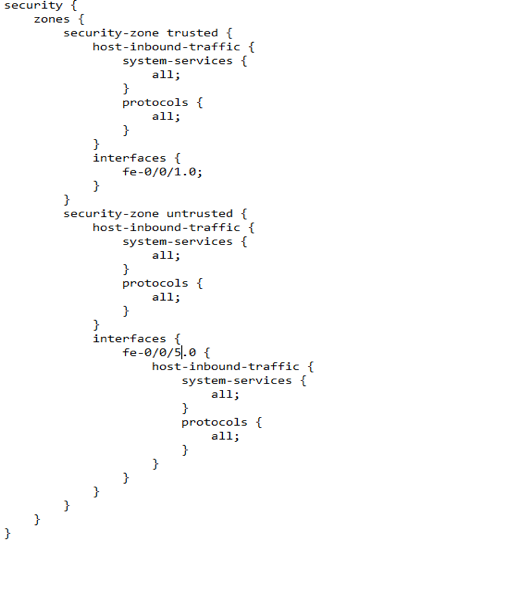
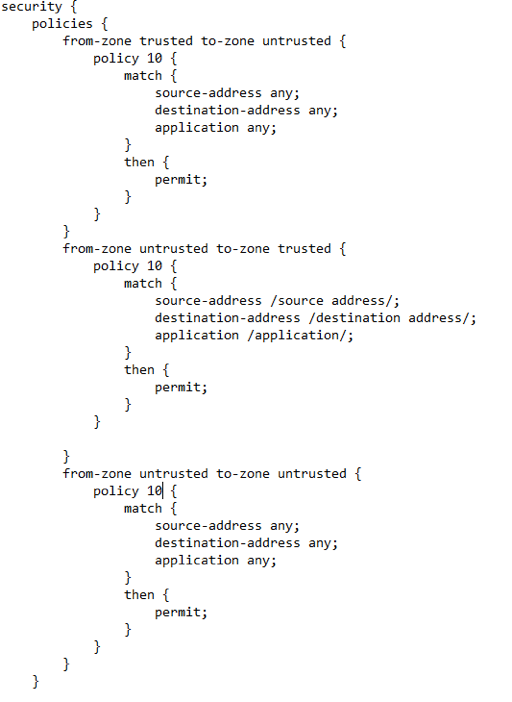
- Define security zones
- Create a security policy to allow traffic between zones
- Add any firewall rules
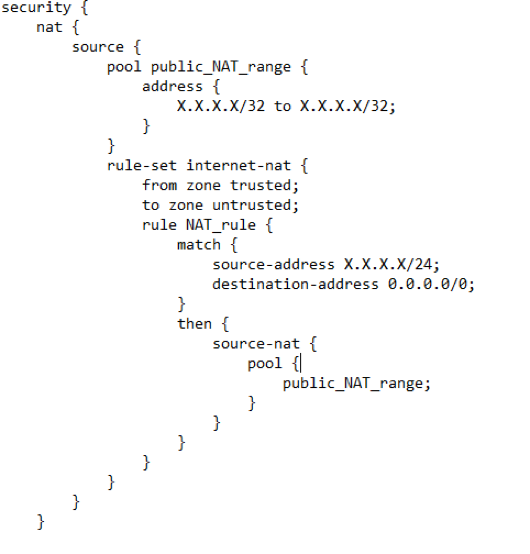
- Add any NAT rules
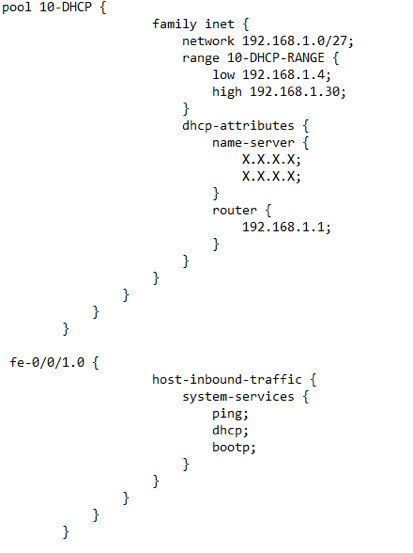
- Add any DHCP configuration
- set security forwarding-options family mpls mode flow-based
- The next step would be to add the policy that will allow traffic flow between the zones:
- Next, we must configure NAT using an address pool and a static NAT to make the end customer able to browse the Internet with a private IP address:
- After the NAT configuration we need to focus on the DHCP configuration. When we are configuring DHCP we must specify the DHCP pool, the interfaces that will work as the DHCP servers, the low and high IP address to be assigned, the default gateway and the DNS server IP (primary and secondary):
To verify if the above configuration is working please execute the following command:
- show security nat source rule X- where the X Is the rule you specified in the NAT configuration
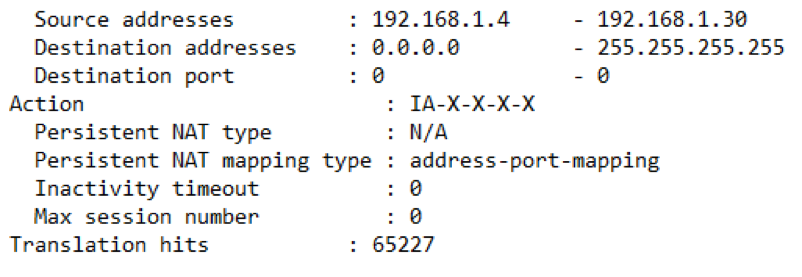
If these hits are incrementing the NAT works as expected and the private IP block is being translated into a public IP address. Customer successfully browses the Internet with a private IP address.
Summary
In this brief article we covered the basics of Juniper’s SRX series devices and we only scratched the surface of their networking capabilities. If we go deeper and research all their capabilities, we will end up with hundreds of pages of definitions and configuration examples. In the end, we will end up concluding that Juniper SRX devices, which operate on Junos OS, have a lot more capabilities than most firewalls currently on the market. In addition, we covered a configuration sample and the basics needed to manipulate the traffic with the flow mode forwarding option, which allows us to implement a more complex solution to meet the client’s requirements.When it comes to processing traffic, you can choose from a wide variety of options that will best suit your network. By knowing and understanding how these modes and the separate policies work, you have the possibility to create a powerful tool to protect your network.
Thank you to Bojan Janevski for his work on this article.